
I don’t usually play around with Materials in Revit, and even less so with renderings out of Revit, but recently I was engaged by couple of people with questions about those so here’s some thoughts.
Daniel Nielsen has asked on the Dynamo Forum, if its possible to “load” materials from a Material Library into a project without having to manually slick on every material. Dimitar Venkov responded that it might be possible with the Document.CopyElements() method in Revit to instead “copy” them from one project to another. That’s exactly what I did and it worked like a charm:

This node is relatively simple and does exactly one thing: copies all of the materials from the specified project into the current project. It will – by default – not override materials that already exist in the project. Here’s code that it’s running under the hood:My next challenge came from a colleague of mine in Melbourne office. Joseph Keogh asked if we could maybe put together a Dynamo routine that will allow him to swap all of the materials for a single generic one (default white material), run a “clay” rendering, and then of course return all of the materials to their original state. Wow, now that’s something that can be done – but as usual my contrarian nature reminded me to ask WHY? Why, the hell would you want to do that in Revit, instead of just exporting to 3DS Max for a rendering, as it was made to make renderings and its darn good at it. Well, as usual I was reminded that some people actually “like” to stick with a single software – oh my, why did it have to be Revit? Anyways, after a few drinks that night I decided to give it a go. Here’s a few things that I have learned along the way as well as the functioning (about 95%) workflow for doing exactly what Joseph was asking for.
I must make a disclaimer note here: please do not attempt this workflow at home – it’s highly dangerous and as presented was done on a detached Revit model by a professional Dynamo Monkey (a really bad one with no regard for human life and safe revit practices).
Before I did anything I wanted to make sure that I have a point of reference so that I can compare any changes to before and after images. Here’s an image I rendered out before making any changes to the model:  Let’s begin:
 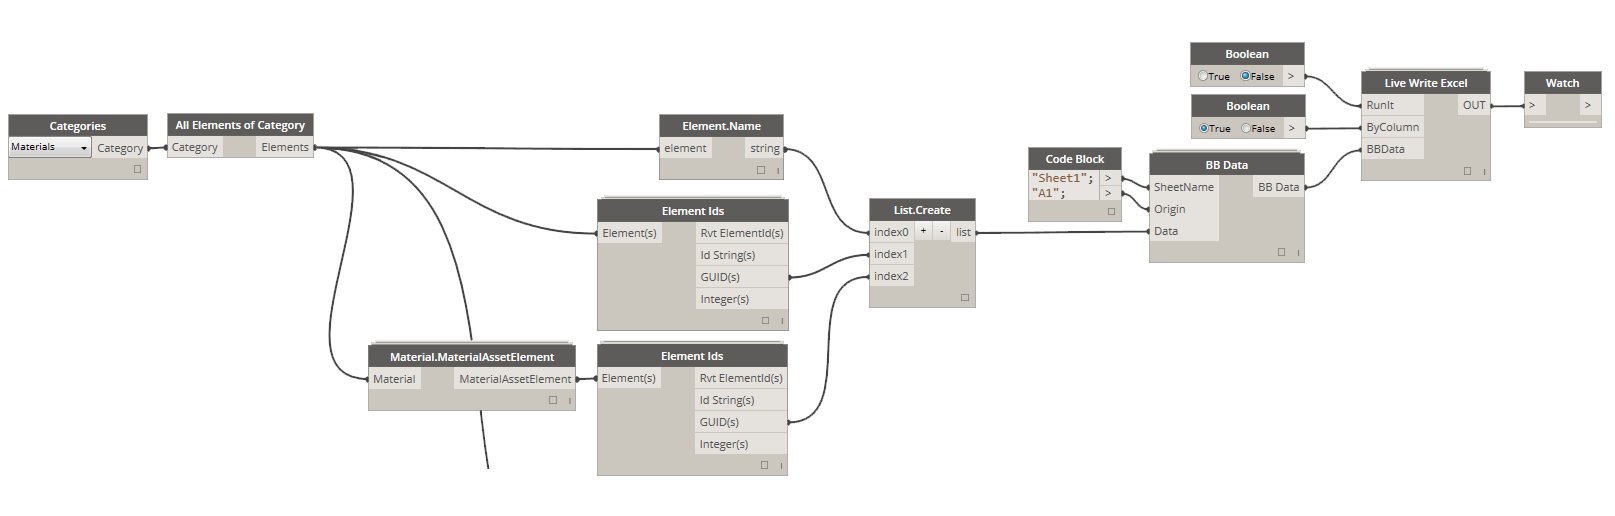 First step was to make sure that if I screw up, which of course I did, I have at least saved the current state of the Material library somewhere safe. My idea for this workflow, at least initially was to extract all of the Material Properties like Color, Smoothness etc., and save it out, then swap all of these properties for my own. Quickly I realized that was not the way to go, and that Revit actually doesn’t use those properties for rendering but instead uses something called Material Asset Element and exactly a Rendering Asset contained inside of it. There is of course an exception to this rule – we wouldn’t be talking about Revit if there wasn’t – in case that Material doesn’t have an Appearance Asset assigned, it will render using its standard Color, Smoothness etc properties. This will be true for materials that were created via API, as initially they do not hold any Assets unless specifically added. It is also true for some of the System Materials that are already loaded into the project. Anyways, I decided that instead of going into a massive properties override routine, I would instead just assign every Material a new Rendering Asset and then Re-assign it back to its old one. Sounds reasonable, and that’s exactly what I am doing here by first taking a Material Asset Element for every Material in the project and saving its ID to Excel so that I can roll it back later. Here’s code for the Material.MaterialAssetElement node:
Now, that I had my safety net in place, I went on to perform the climax of my material symphony: override all of those suckers so they all render the same:

Oh wow, that wasn’t so bad. It might take a while as Revit will chug on it for a little bit (3-4min), but all in all it made my Material Library look like this:

Hahaha, yes that’s a little scary but exactly what I wanted as now I can render my sample image out, and it will look like this:

Not exactly a “clay” rendering, but good enough for some simple diagrams and takes about 1 min to render.
Here’s code that runs under the hood of Material.SetMaterialAssetByMaterial:
Next was the tricky part: roll it back to what it was before. Ha! I can honestly just hit Undo button and all will go back to normal, but that was not the idea here. What if I did a bunch of Rendering set up and maybe even created some cameras etc since I swapped all of my materials. No, I had to roll it back to what it was using my Excel file that we produced in the first step.
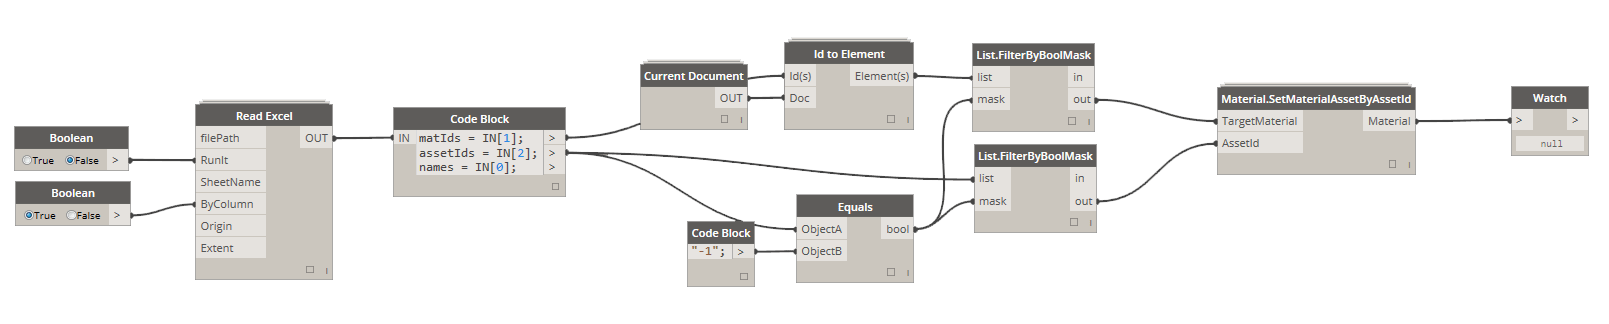
What I am doing here, is relatively simple. I am taking all of the Material GUIDs that we stored away, and using them to retrieve the actual Materials from the model. I am doing that, just in case that we added some new materials or even if we are working on a Workshared model if someone has synched the mode, ids of Materials might have changed. GUID’s are probably the safest bet here, so I am using those to get our Materials back. Then I have also stored away original Material Asset Element GUIDs, and I am using those to re-assign the original properties. There was one last thing that I did here, that is I quickly filtered out Materials that didn’t have an Asset to begin with, hence their GUID was equal to -1. Here’s a little twist to this whole workflow. Revit will allow you to create a Material that has no Appearance Asset assigned. It will then let you add one to it. It will also allow you to replace it with a different Asset as many times as you want. It will not, however, allow you to delete an asset from the Material once it was added. That’s a bummer. That basically means, that some of the materials was scarred for life by our tinkering and from now on, they will always render using the Appearance Asset and will no longer render using the default Color, Smoothness etc. properties. That’s not ideal, but not end of the world. We just have to make sure that we either define Rendering Appearance for all of our Materials or that we don’t actually use Materials that don’t have it defined. I am not sure it makes sense to use Materials that don’t have a Rendering Asset defined for rendering purposes because they just look like shit anyways. Long story short, I was able to re-assign all of them, except ones that didn’t have it originally and render my image again, for comparison.

Yes, it looks like some materials now will always render with the “default” appearance but I am game with that – for now. :-)
Here’s code that I used in the Material.SetMaterialAssetByAssetId node:
I hope that you enjoyed this little Materials session, and that you have maybe learned a thing or two about Materials and Revit. As usual feel free to hit me up with any questions. Peace!
Ps. It’s worth mentioning that a friend of mine: Havard Vasshaug was chosen Number One speaker for RTC EUR 2015. Congrats Havard! Link to his write up about it.
Ps2. It’s probably worth mentioning that he also recently spoke at an event in San Francisco and managed to spill a lot of love (and some harsh but deserved criticism) about one of my plug-ins – Mantis Shrimp. Listen and watch it here.


Konrad,
While it is also possible to render a “clay” or “white” model using a future phase with material overrides (see link below), your solution could improve on that workflow by allowing the user to filter some materials to remain unchanged or mapped to some specific effect.
One example of this would be to map all materials having a transparency assigned to asset to a generic transparent material with no reflection or refraction index (in order to speed up rendering).
Another enhancement would be to retain the rendering assets of an accent material while rendering the rest of the project a neutral color.
Great work,
Luc
Rendering a basic ‘white card’ model – switching off existing materials:
http://www.revitforum.org/rendering-gallery/16997-rendering-basic-white-card-model-switching-off-existing-materials.html
Luc,
This is great! Thanks for sharing. So, did I just waste all this time doing this weird workflow while I could have been just changing phasing in my model? Mhmmmm I am an idiot.
Luc,
Also, to comment on the improvement suggestion, yes one doesn’t have to grab ALL of the materials in the model and swap their appearance asset. I could have easily filtered out some special materials that I want to accent in my model and leave those with their original settings.
Konrad,
While both approaches (Material asset swap and Phasing Override) can achieve the all “White” or “Clay” models, I agree that the phasing material override is cleaner since it doesn’t “destroy” the original material asset state.
But when confronted by and additional filtering requirements, for transparency and highlighting etc, your approach allows multiple material assets to be temporarily assigned, which is not possible with the limited material overrides such as Phasing overrides or by painting surfaces.
My personal wish list would be to filter materials by the material asset transparency with the Clockwork node “Material.Properties” before assigning it to an opaque (say = 20%) material asset.
I would also like to propose an additional workflow for your asset re-mapping approach. Should I propose it here?
Thanks,
Luc
Yes, of course. Fire away.
Would it be possible to create a temporary view similar to the Material Object ID channel in Maxwell Render as described here: http://support.nextlimit.com/display/maxwelldocs/MatID+-+ObjectID+channel
This would involve changing the graphic material parameters to unique RGB colors assigned to materials so that groups of objects sharing the same materials would appear as a like-colored silhouette.
A subsequent step would then be to override all objects linework in a that view so that the black object silhouettes would disappear as with the change linework tool using .
The user would then export an image file of the view to aide in post production work in an image processing suite.
Luc
Mhmmmm, I am only slightly intrigued by this workflow (sorry man, but I just don’t think that it would be helpful for my purposes) and on top of that I just got really busy at work for the next few days. I will think about this, but no promises. I am, however, open to posting here any results that you can achieve and are willing to share.
No worries.
Thanks – luc
Hi!
I am posting here since I remained very impressed and guess you can answer my question, which is somehow related to the topic (Revit materials).
A known issue (I know it since this morning, but saw other guys got really mad about it ;) of Revit material library (.adsklib files) is in fact they doesn’t store graphic assets of materials, so that when you import them into a different projects… Pouff, everything’s gone, unless you use TPS and unless you also transfer line weight, patterns and so… Which is a problem if you (for example) wish to get only a few materials from the library or intend to use the library with a previous version of Revit (which can be done, but you’d have to re-compile graphic assets…)
Now my question is: can Dynamo provide a workaround for this, passing through Excel or… I am only wasting my time guessing about how to accomplish this?
Thank you very much!
M
Well, I think you could move a material from one project to another via simulating a copy/paste because yes, certain things are not stored in the material itself. However, when you copy/paste it will move all of these extra definitions with it as well. That’s just an educated guess. Of course you can use code/dynamo to do the copy/pasting so if you have a project that acts as a material repository, then you can copy materials from it into other projects. Can you potentially store fill pattern info in excel, and then re-create the fill pattern? Yes, technically you can, but that feels like an overkill.
Hi.
I have a question.
I would like to do parallel processing on Dynamo.
I read on Kean Walmsley’s blog that this can be done by importing the System.Threading.Tasks library.
However, I don’t know how to write the script.
InSpace node of archi-lab.net, which is a custom node.
InSpace node of archi-lab.net, which is a custom node, is too heavy to use in a large project.
Is there any way to solve this problem?
from japan
Attachment: image-55.png
Shoyo, I am not sure if your idea will make Dynamo faster. In general Dynamo is slow since it’s a plugin for Revit, that then executes Python code which is interpreted from a string via a library called IronPython. That whole enterprise is generally slow. To speed things up, I would first run the code you want to run directly in Revit via either a direct Revit plugin, or Revit macro. That should help with speed. Now, multi-threading is not going to do much good here since Revit will process your multi threaded requests in a single thread by queueing them. It’s just the way it is. Not being in Dynamo might allow you to do this faster, with a progress bar and all that. If you want speed, you kind of need to get out of Dynamo. It offers flexibility but not speed. Sorry.
Ps. I can offer consulting services, if that’s what you are interested in, and write a plugin for Revit that would do what you are looking to do. You can reach out to me at sobon[dot]konrad[at]gmail[dot]com
Hi absolutely love this post.
The material import all from project Node. Is literally saving my life as I deal with files where the material assets have been poorly created and conflict within multiple families within a project.
I’m a bit limited when it comes to understanding python, but is there a way of changing the default setting to overwrite the materials.
Is there a way of utilizing the transfer project standards within Revit with the Override check box in dynamo?
You can’t really transfer project standards via the API/Dynamo etc. It’s not exposed.