
Create Annotation Tag
This node will create an annotation tag in a specified place (points, views) . Make sure that the list of Points, Views and Elements to be tagged are matching in length. If you want to tag all elements in a single view, you don’t have to duplicate it – just plug in that single view.

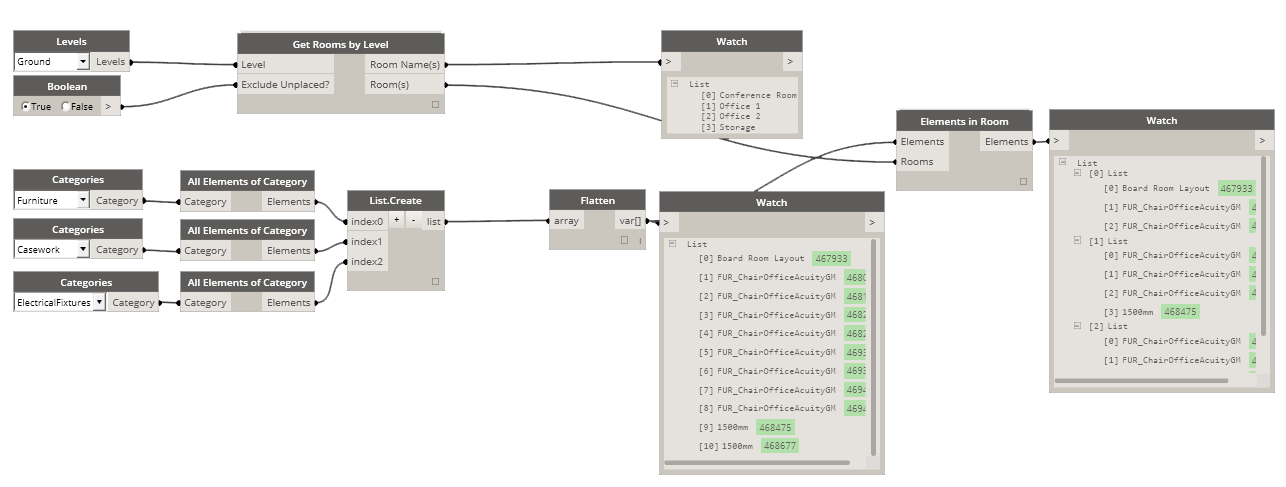
Elements in Room
This node will check all of the supplied elements if they are located in any of the supplied rooms. The output will be a list of families grouped into sublists that match the order of supplied rooms, which makes for easy grouping of all families within a room. Use multiple All Elements of Category nodes to combine specified category types of elements. Use Get Rooms by Level to get all rooms per level that are placed.
Elements From Linked File in Room
This node will check all of the supplied elements if they are located in any of the supplied rooms. The output will be a list of families grouped into sublists that match the order of supplied rooms which makes for easy grouping of all families within a room. Use Get All Elements From Linked Model to get family instances from linked model. Use Get Rooms by Level to get a list of rooms by level that excludes unplaced rooms. Those two custom nodes can be found inside of archi-lab package.
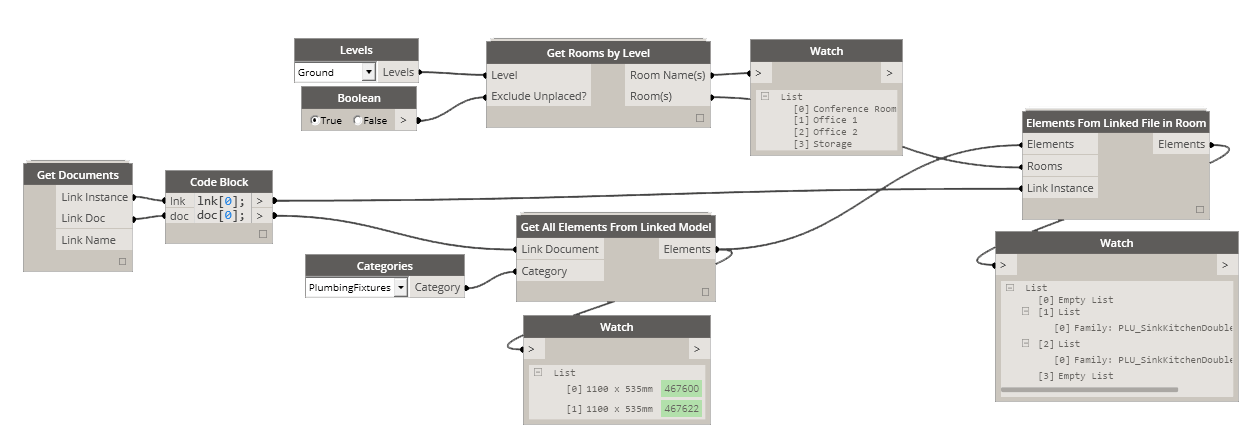
Get All Elements From Linked Model
This node is a slight modification to Julien Benoit’s node published in his Steam Nodes package. It will retrieve all elements of a given Category from a given linked model. Link Document input can be obtained from another archi-lab package node called Get Documents.

Parameter Types
This node will query up all available Parameter Types. This node comes helpful when creating a new parameter in the project. Most well known Parameter Types are Yes/No, Text, Integer etc, but bear in mind that this is a list of all available types from Revit API so it will also contain some types like HVACCoolingLoad or BarDiameter which clearly are meant to be used with MEP and Structural models.

Parameter Group
This node will get you all of the Parameter Groups available in the project. A Parameter Group is where visible parameters are displayed in the Properties box when element is selected.

Add Shared Parameter to Project
This node does two things. First it creates a parameter in the Shared Parameters file and then adds it to the project. As you can see in the image below it can create either a single parameter or a number of parameters. Here’s what the inputs are supposed to be:
- Parameter Name – This can either be a list or a single string. If this parameter is a list then Visible and Instance have to be lists of the exact same length.
- Shared Parameter Group Name – This is a name of the group that the parameter will be stored in the shared parameter file. Keep in mind that this is not the same as Parameter Group.
- Parameter Type – Use the Parameter Types node to get a value for this input.
- Visible? – This is a True/False setting that will either make this parameter visible to the user or make it only accessible via API.
- Element Category – This is a category that the parameter will be added to. In the example below its a Generic Model but could be Furniture, Casework etc.
- Parameter Group – Use Parameter Group node to get a value for this input.
- Instance? – This is a True/False setting that will either make this an instance or type parameter.

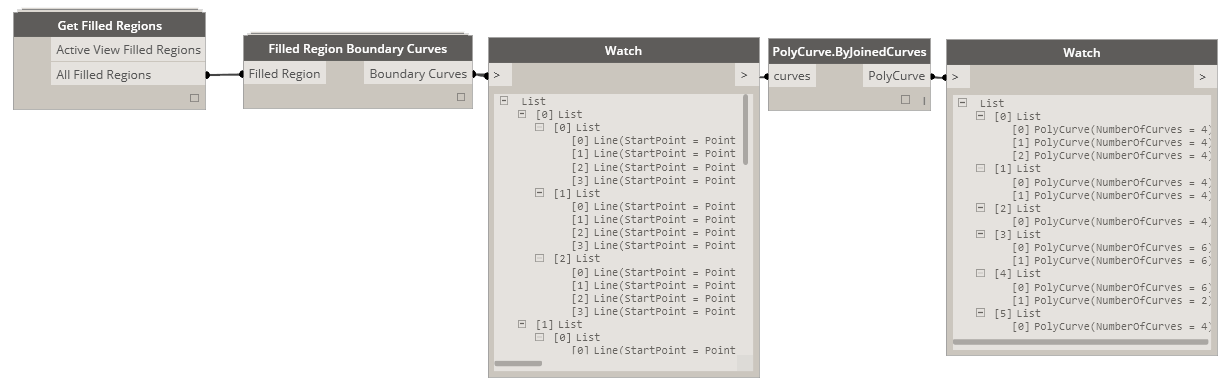
Filled Region Boundary Curves
This node will query all of the boundary curves from a give filled region. Each loop of curves then will be outputted as a sub-list for that filled region. This makes it easy then to join all of the curves into polycurves while maintaining the association with the original source.
Filled Region Area
This node will retrieve an area of a filled region.

Get Filled Regions
This node will get you all of the Filled Regions in the model. It also outputs them pre-sorted for the current view.

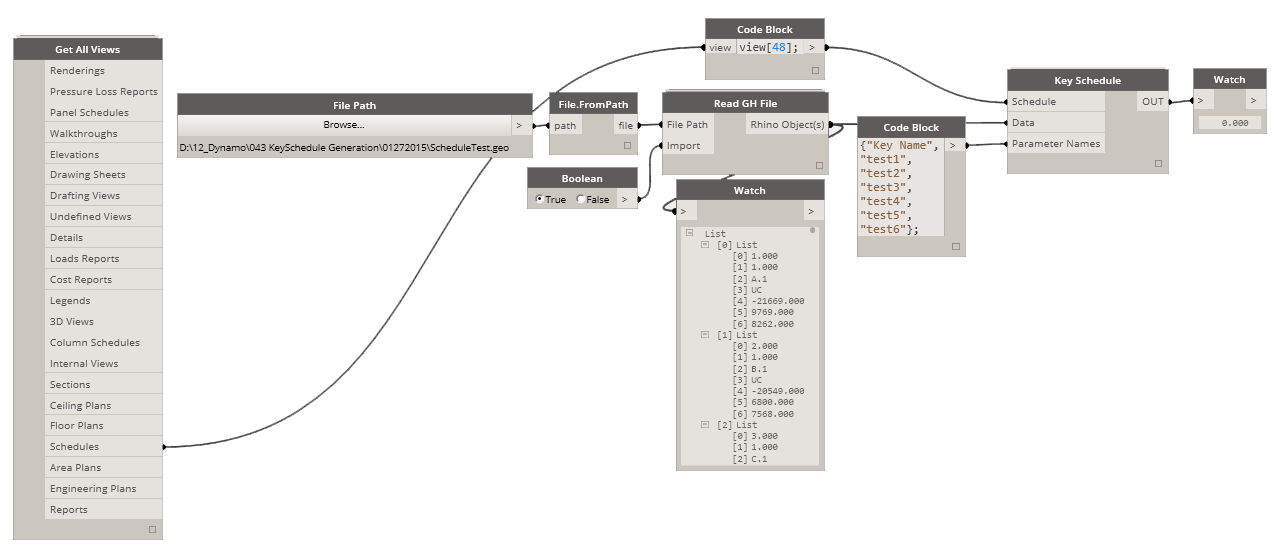
Key Schedule
Now this node WILL NOT CREATE a Key Schedule. This node will take a key schedule created in Revit and add rows based on number of data points in the Data input. It will then take the data supplied and fill in the parameters for each row. If you know how KeySchedules operate under the hood in Revit then you know that each row of in a key schedule is an element in Revit DB (like a family). Each element then has as many parameters assigned to it as there is parameters (columns) in the schedule. Each key schedule comes standard with a Key Name parameter already loaded and added to every new row. that’s the first data point in all of my sublists. Each sublist holds as many items as there are total parameters (columns). Keep that formatting going and you will be fine.
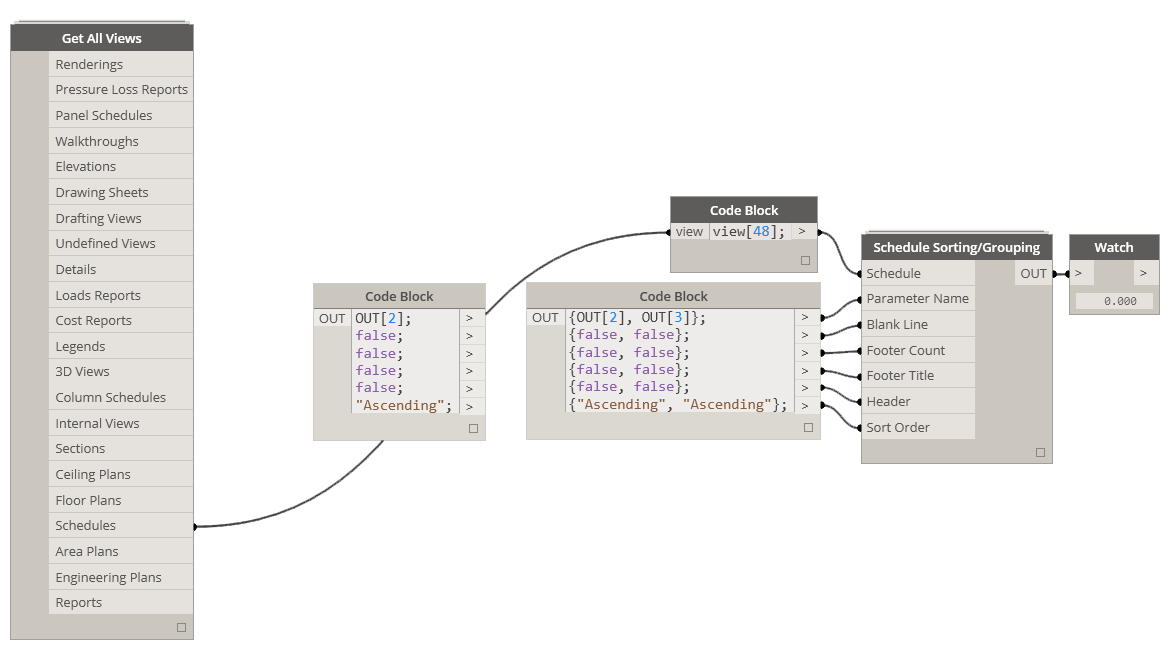
Schedule Sorting/Grouping
This node controls schedule grouping. Just like in the regular Revit UI, you can only set 3 sorting and grouping parameters (Revit 2014). Please see the example below for setting one sorting parameter (smaller Code Block) and multiple parameters (larger Code Block)I believe that in Revit 2015 you can use more, but I haven’t tested this on 2015 yet. I don’t know why, I am still in 2014 which makes no sense since Autodesk is on subscription so everyone has updated to newer version of Revit. I think its time to move on. Inputs are:
- Schedule – this is a ViewSchedule that you want to control.
- Parameter Name – For this input you have to specify a name or names of parameters. Remember that each parameter represents a column in a schedule. You can supply either a list of parameter names like in the larger Code Block below, or a single parameter name (smaller code block). If you feed it a list, then make sure that all other inputs are lists of matching length.
- Blank Line – Boolean input (true/false) that when set to True will add a blank line after the group.
- Footer Count – Boolean input (true/false) that when set to True will make the count appear at footer.
- Footer Title – Boolean input (true/false) that when set to True will make the footer title appear.
- Header – Boolean input (true/false) that when set to True will make the header appear.
- Sort Order – This can be set to either “Ascending” or “Descending”.
Cell Style Settings
This node creates a Cell Style Settings that can be used to override visual appearance of cells in a schedule. For now I was only able to override a Title Cell (see below), but there might be more possibilities. Inputs are:
- Background Color – it requires an input of a DS Color object so fastest way is to use a Code Block and DSCore.Color.ByARGB(1,0,0,0) code. There is also a new Package called UI++ that has a more intuitive color picker as demonstrated below.
- Bold – Boolean input (true/false) that when set to True will make the text bold.
- Font – Feed a name of the available font ex. Arial, and it will set the cell font to that style.
- Font Color – another color input. Please see above.
- Font Size – ha! I am not sure about this one…I will have to verify this but i think its 1-16 range of sizes.
- Italics – Boolean input. See above.
- Underline – Boolean input. See above.
- Orientation – This particular setting has not been tested extensively so use with caution. TextOrientation Property The orientation of the cell (for vertical/horizontal text) with input in degrees multiplied by 10. This was the official Revit SDK explanation. Use at your own risk and let me know if it doesn’t work.
- Horizontal Align – This can be set to either “Left”, “Center” or “Right”.
- Vertical Align – This can be set to either “Top”, “Middle” or “Bottom”.
- Header Text – this parameter probably shouldn’t be here, but it controls the Title text. See below for Schedule Title overrides.
- Border Left – This input if set will override the border Line Style at the left of the cell. Please use Get Line Style by Name to get a line style object of your desire.
- Border Right – This input if set will override the border Line Style at the right of the cell. Please use Get Line Style by Name to get a line style object of your desire.
- Border Top – This input if set will override the border Line Style at the top of the cell. Please use Get Line Style by Name to get a line style object of your desire.
- Border Botttom – This input if set will override the border Line Style at the bottom of the cell. Please use Get Line Style by Name to get a line style object of your desire.

Schedule Title Appearance
This node will override the appearance of the Title section of the schedule. Please see above for the things that can be controlled and how to set them.
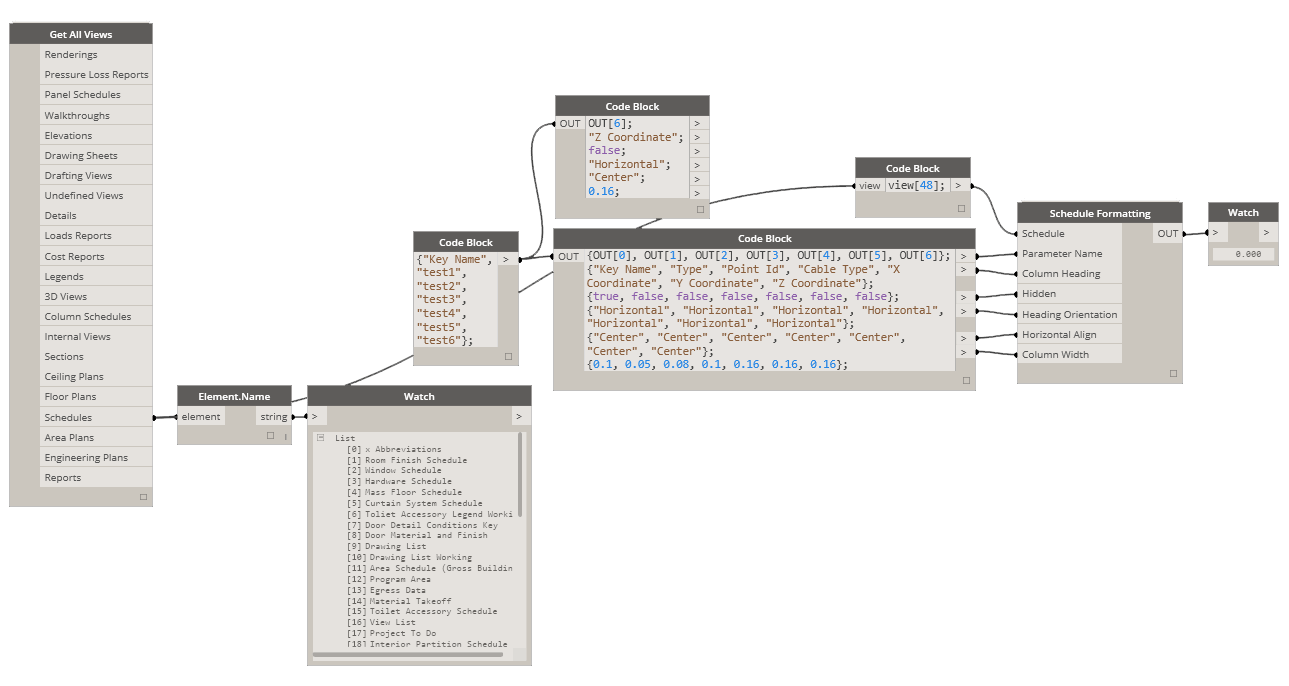
Schedule Formatting
This node will allow you to control schedule formatting. Just like in the Revit UI you can control some basic visibility settings per parameter (column) in a schedule. Parameter inputs are:
- Schedule – this is a ViewSchedule that you want to control.
- Parameter Name – For this input you have to specify a name or names of parameters. Remember that each parameter represents a column in a schedule. You can supply either a list of parameter names like in the larger Code Block below, or a single parameter name (smaller code block). If you feed it a list, then make sure that all other inputs are lists of matching length.
- Column Heading – this sets the text visible in the schedule. By default every column heading is a name of the parameter. This input will override that.
- Hidden – this input accepts a Boolean (true/false) as its input and if set to True will hide the entire column from schedule.
- Heading Orientation – This parameter accepts only “Vertical” or “Horizontal” as its inputs. It will make the heading either vertical or horizontal.
- Horizontal Align – This input can be set to one of the three options: “Left”, “Center” or “Right”. It will justify text to either of this locations.
- Column Width – This input will set the Sheet Column Width for the schedule. That means that value specified is in feet and has no scale. When 0.5 (6″) is supplied the column width will be exactly 6″ in paper space. In the example below 0.16 represents ~48.8mm of paper space width.
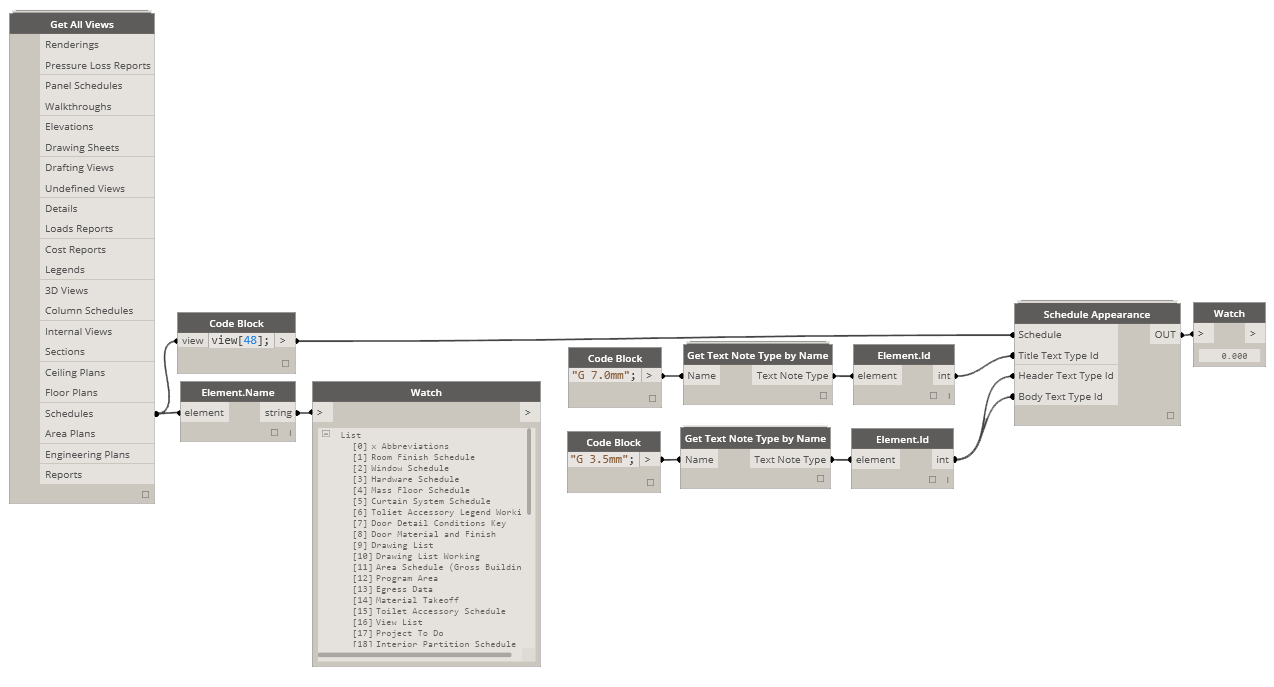
Schedule Appearance
This node allows you to modify schedule appearance settings. Due to my limited Revit API knowledge for now you can only override Title, Header and Body Text type by feeding it an id of a Text Type that you want to use. Use, Get Text Note Type by Name from the archi-lab package to get the appropriate text style.
Apply View Template
This node allows you to apply a View Template to a view in Revit. Feed in a list of views and a view template name to apply it to all views on the list. Get All Views node comes handy to collect all of the views that interest us.

Group Curves
This node will take a flat list of curves and group them into sub-lists if they form either closed curves or open continuous curves. This node is useful when PolyCurve.ByJoinedCurves fails returning an error that supplied list contains multiple “wires”. It will split those curve loops into two separate lists and allow successful PolyCurve creation. In combination with PolyCurve.ByJoinedCurves it pretty much does what JoinCurves method does in Rhino.

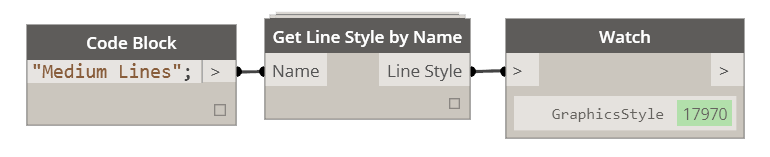
Get Line Style by Name
This node will retrieve a Line Style from Revit project by its name.
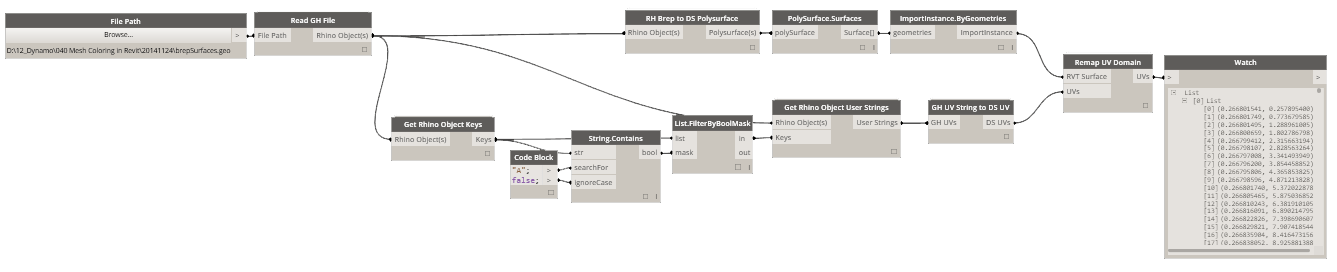
Remap UV Domain
This node will remap any set of UVs to supplied surface domain. Use this node with to create set of UVs on surface to be used with analysis display styles.
Colored Surface Display Style
Use this node to generate a display style using Colored Surface Settings. This display style is still a work in progress and has been tested on a limited number of possible case studies so please do not be disappointed if you do not get it to work properly. Please feel free to email me your files so that I can further test this node. This node has twelve (12) inputs:
- Values – supply a matching list of values (one points – one value) that will be used to generate the display style.
- Surface – supply reference surfaces from Revit (family instances suffice)
- UV Points – supply set of coordinates in reference surface UV domain that matches length of values
- Color Settings – output of Color Settings node. Please see below.
- Legend Settings – output of Legend Settings node. Please see below.
- Colored Surface Settings – output of Colored Surface Settings node. Please see below.
- Display Style Name – name for the display style (string).
- Analysis Result Name – name for the analysis result (string).
- Analysis Result Description – short description for the analysis result (string).
- Units Names – a list of possible units ex: kWh/m2, MWh/m2, GWh/m2 or Feet, Inches.
- Units Multipliers – a list of multipliers for the units. For example if original data was supplied in Feet (height) then multiplier is 1.0 but if we wanted to display the same data in inches then multiplier for inches is 12 since data needs to be multiplied by 12 to convert from feet to inches.
- Display Unit – this will control which units from the list of supplied ones will be displayed. Make sure that name matches one of the supplied ones.


Colored Surface Settings
Use this node to define colored surface settings for Colored Surface Display Style. This node has four (4) inputs:
- Show Gridlines – please use Boolean True or False to either display or hide gridlines (UV Gridlines).
- Show Contour – please use Boolean True or False to either display or hide surface contour lines.
- Line Weight – please define line weight for the contour/grid lines. Line weights can be defined in range from 1-16 (typical Revit range).
- Line Color – please supply a Dynamo color for the gridlines/contour lines.

Get Text Note Type by Name
Use this node to retrieve a Text Type by its name. Remember that with imperial naming, where quotation marks are used to indicate inches, you need to use backslash followed by quotation mark to not break the string (code block only). You can also use regular Dynamo String node and not worry about what I just said.

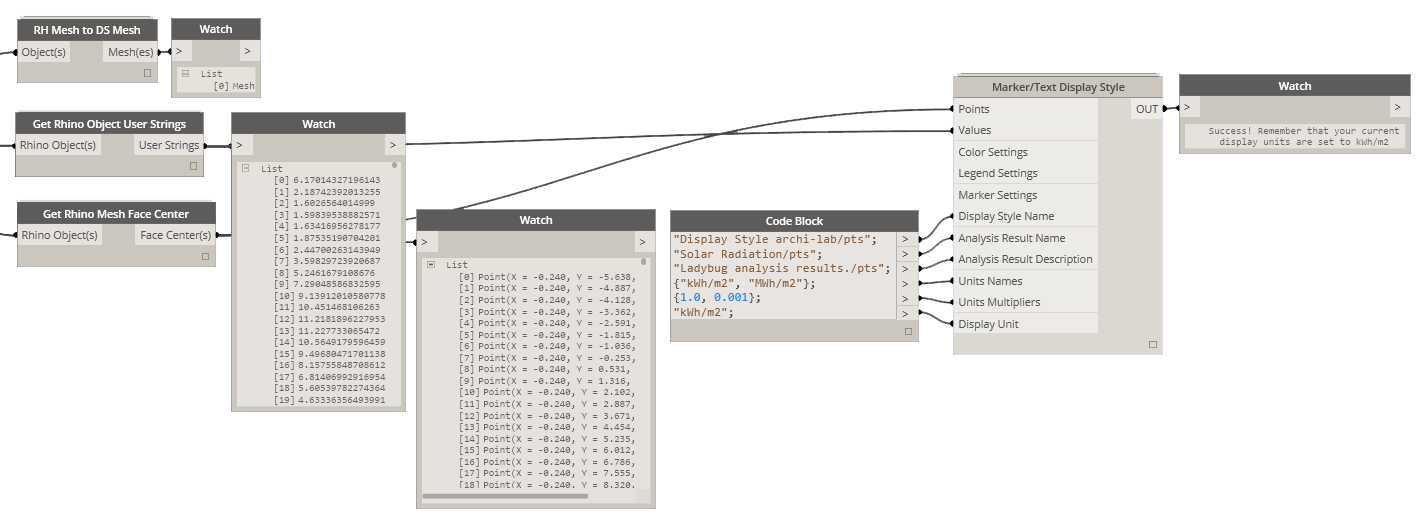
Marker/Text Display Style
Use this node to generate a display style using Marker and Text Settings. This display style can be generated from any number of points that is less than 800,000. I believe that is a internal limit that Revit has. This node has eleven (11) inputs:
- Points – supply a list of Dynamo points that will be used to generate the display style.
- Values – supply a matching list of values (one points – one value) that will be used to generate the display style.
- Color Settings – output of Color Settings node. Please see below.
- Legend Settings – output of Legend Settings node. Please see below.
- Marker Settings – output of Marker Settings node. Please see below.
- Display Style Name – name for the display style (string).
- Analysis Result Name – name for the analysis result (string).
- Analysis Result Description – short description for the analysis result (string).
- Units Names – a list of possible units ex: kWh/m2, MWh/m2, GWh/m2 or Feet, Inches.
- Units Multipliers – a list of multipliers for the units. For example if original data was supplied in Feet (height) then multiplier is 1.0 but if we wanted to display the same data in inches then multiplier for inches is 12 since data needs to be multiplied by 12 to convert from feet to inches.
- Display Unit – this will control which units from the list of supplied ones will be displayed. Make sure that name matches one of the supplied ones.

Color Settings
Use this node to define Color Settings for any of the Display Styles. This node has one (1) input:
- Colors – it’s a list of colors that will be used to create a color gradient for the legend. If you supply only two colors they will be used as Min and Max and Revit will automatically generate a gradient between those two. If you however choose to supply more than two colors first will be a min color, last will be a max color and all colors in between will be used to generate the gradient. Please use List.Create to combine all colors into a list.

Legend Settings
Use this node to define Legend Settings for any of the Display Styles. This node has ten (10) inputs:
- Show Legend – please use Boolean True or False to control if legend will be displayed.
- Show Units – please use Boolean True or False to control whether legend will display units or not.
- Show Name – please use Boolean True or False to control whether Analysis Result Name will be displayed above the legend.
- Heading Text Type Id – this input should be supplied with a text type id value of the text type that you wish to see used for the legend header.
- Body Text Type Id – this input should be supplied with a text type id value of the text type that you wish to see used for the legend body.
- Show Data Description – please use Boolean True or False to control whether Analysis Result Description will be displayed below the legend or not.
- Rounding – this will control how much values displayed on a legend will be rounded
- Graph Height – this will control graph height in. Remember that value supplied will be in units of the project and acts similar to annotation in Revit where its not scaled.
- Graph Width – same as above but for the graph width.
- Graph Steps – this value will determine how many values are displayed between min and max on the graph.

Marker Settings
Use this node to define Marker and Text Settings for Marker and Text Display Style. This node has five (5) inputs:
- Marker Type – defines marker shape. This can be set by plugging in a String with one of the following names: “Triangle”, “Square” or “Circle”. Only one of the three will work so please make sure that you do not try to use a different one.
- Marker Size – use this to define a size of the marker. Size is always in view units so if your project is set to inches this values will represent inches.
- Text Type Id – this input should be supplied with a text type id value of the text type that you wish to see next to each marker. Visibility of marker values can be controlled with Text Label Type input. Please see below.
- Rounding – this will control how much marker values are rounded
- Text Label Type – this input can be supplied with one of the following inputs: “ShowAll”, “ShowNone” or “ShowPredefined”. If you wish to see values displayed next to markers use ShowAll. If you wish not to see the values use ShowNone. ShowPredefined will only display values for points that have proper flags assigned to identify them as ones that values should be displayed for. I will explain how to assign flags to points to control this settings in the future so please do not use this setting for now.

Get All Views
This node will query all views in the project and return them in categories by View Type. Those can be then combined if all views are needed.

Delete Linked Model Keynote Tags
This node will delete all keynote tags that are tagging linked model elements and/or have not been assigned a value.
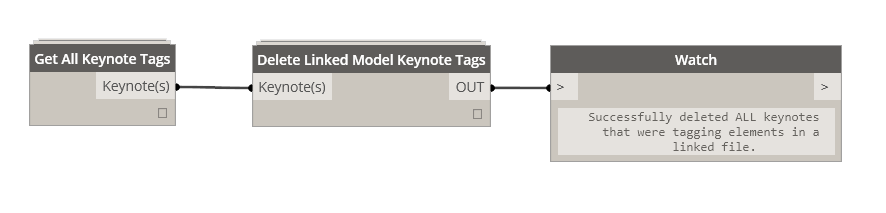
Get All Keynote Tags
This node will get all instance family keynote tags that are placed in the project.

PolyCurve by Profile Family Type
This node will extract curve geometry from Profile Family and convert it to DS PolyCurve or multiple PolyCurves if profile contains more than one loop of curves. It comes handy when dealing with Sweeps and Extrusions in Dynamo.

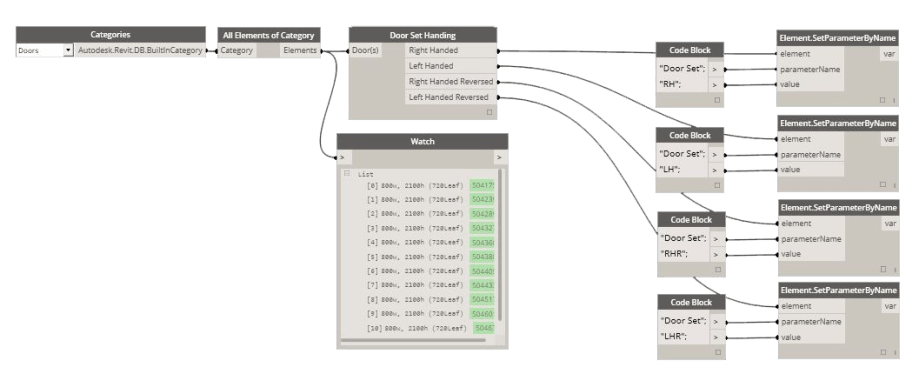
Door Set Handing
This node will query a door and based on its HandFlipped(), FacingFlipped() and ToRoom() properties will determine if its a left, right, or left/right reversed handed door. Output is four lists of doors, one for each Right/Left Handed Doors and Left/Right Reversed doors. The LHR and RHR is determined by looking at ToRoom parameter. If a door is in the exterior wall it will swing out into space with no room thus ToRoom parameter will be Null.
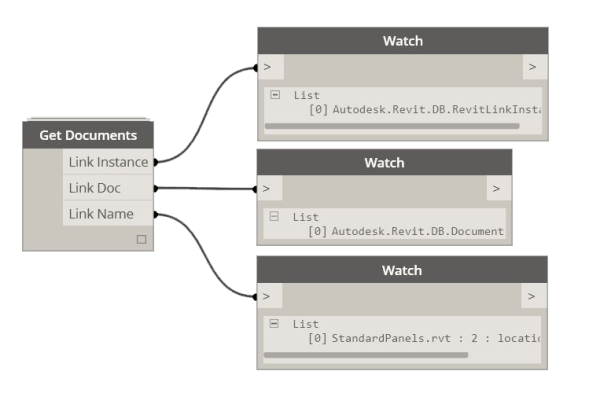
Get Documents
This node is based on node published originally by Julien Benoit for the 0.6.3 version. I had re-made it for the 0.7.1 version since I had a need for it and it was yet upgraded. It will query all of the linked documents (Revit models) and output their name, document and an instance. It comes handy when selecting elements in the linked model.
Id to Element
This node will convert any Id input format into an element. As shown in the image it can handle either strings, integers or ElementId objects. It requires a document input so it can be used to select elements in linked files when combined with Get Documents node.

ElementId
This node will query an ElementId property and output it as a RevitAPI object, string and integer, It also queries element’s UniqueId which is a string object.

Get Design Options
This node will query all Design Options currently in the project and will output them as elements along with their names as strings.

Schedules on Sheets
This node will query all schedules in your project and create two lists. One list will contain all schedules that are currently placed on sheet(s) and one list with schedules that have not yet been placed on sheet(s). Keep in mind that Revision Table built into a Titleblock is really a schedule and will display on the list of schedules on sheets. It might even create more than one instance of such.

Override Fill Pattern in View
Allows you to override fill pattern display settings for given elements in an active view. Use Fill Pattern node to specify Fill Pattern and Color node to supply surface color override.
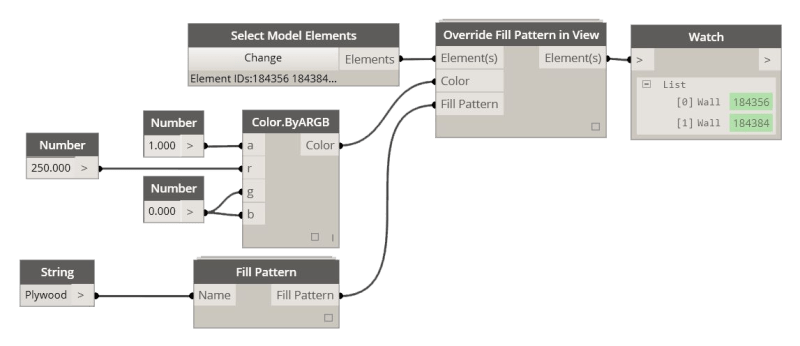
Fill Pattern
Extracts Fill Pattern (commonly known as hatch pattern) from a Revit projects by specified name.

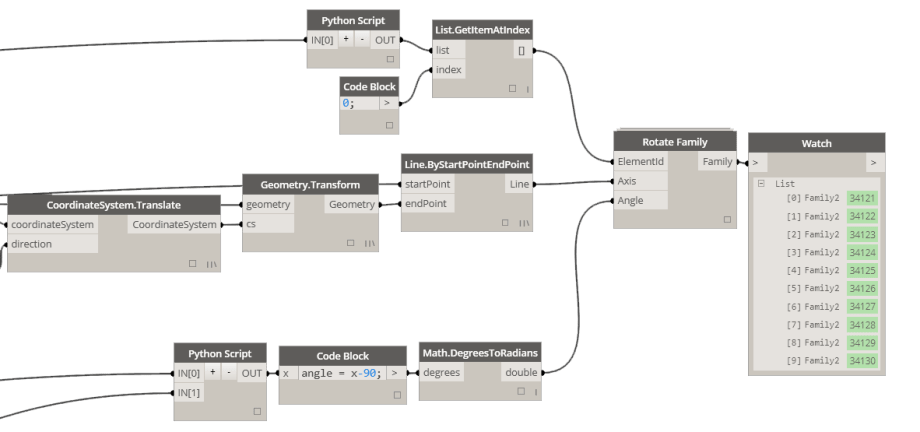
Rotate Family
This node will rotate family instance given a rotation axis and angle. Keep in mind that unless you build some sort of a check into the angle input, it will rotate the family by a given angle every time you Run the definition. Angles should be supplied in Radians.
Change Family Type
Change Family Type node will take an input of family instances and Family Type Ids that you want to change them into. This can be particularly helpful when cleaning up annotation and making sure that all tags are of correct type. It will work on any family type thus making it a universal tool.

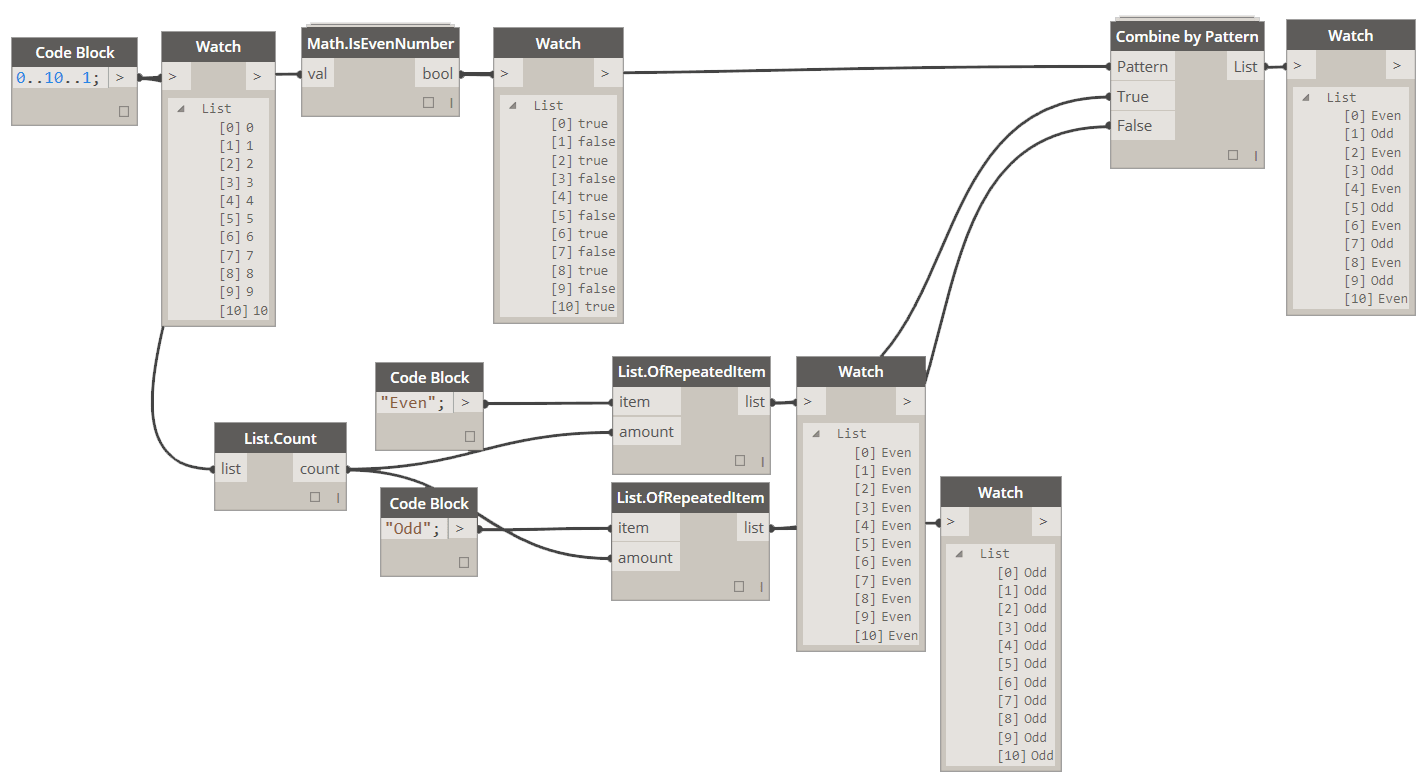
Combine by Pattern
Combine by Pattern node uses a True/False (1/0) Boolean pattern to combine two lists of identical lengths. Its useful when trying to replace elements in a list for example “Null” values with an empty string like in an example below. Test the list for Null and use that as a pattern to replace all nulls with a different value.
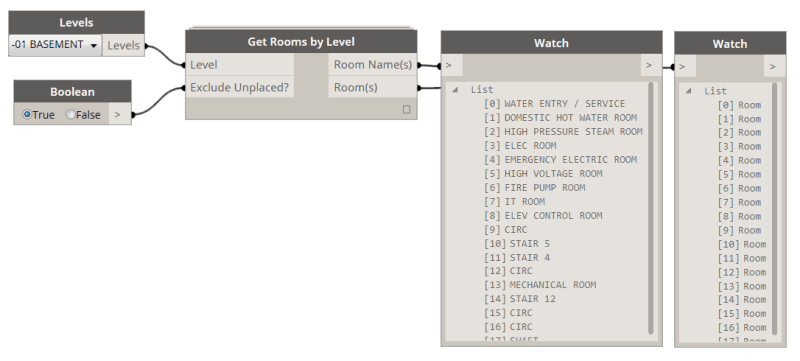
Get Rooms by Level
This node filters rooms by level. Use the Boolean Toggle button to exclude/include Unplaced and Redundant Rooms. When set to True (1) it will exclude before mentioned rooms and list only placed rooms. It can be useful when working with other view based elements and trying to limit data that we are working with. You can still use Unplace Redundant Rooms node to get all valid rooms on a given level while un-placing any redundant rooms. Its core functionality is to Unplace Redundant Rooms from Revit project.
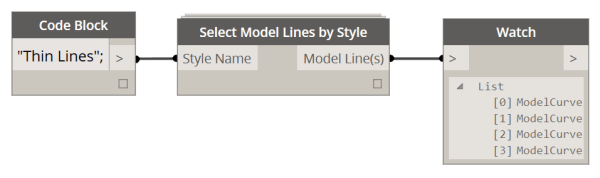
Select Model Lines by Style
This node filters Model Lines by Line Style and returns elements. Please use a Line Style name in form of a String as an input. This node can be useful when cleaning up model lines on large Revit projects.


Great page! Thanks for sharing!
Hi Konrad,
I am new to dynamo and I have really found a keen interest in it. I believe it could help me a lot in doing documentation. Although, I am having trouble in getting the Create Annotation Tag node to work, could you walk me through it?
I am trying to use it for tagging rooms in Revit (does it work for normal plan views or does it only work for locked 3D views?)
I keep getting the error below.
quote
[0] Traceback (most recent call last):
File “”, line 28, in
Exception: There is no tag available.
unquote
I know my question might be silly but I really am not code savvy and I have no idea what I’m doing, although I tried attaching nodes that I think is suitable for this to work but to no avail.
Well, if you are trying to tag rooms i don’t think that you need Create Tag node for it. As a matter of fact i would not use Dynamo for such a trivial task. Revit has a perfectly capable tool to do room tagging. Just go to Annotate tab and use Tag All then pick a room tag and it will tag all rooms for you. I created this node to help tag elements that you don’t really know where Revit will place a tag for. With rooms you will always get a tag right where the room placement point is. With all other geometries it’s a little bit of a guess and sometimes they overlap so I made this node to give me a little bit more control over tag location in those instances. I hope this helps!
Thanks for the quick reply Konrad! Yes, I do use the tag all function in Revit, I was just experimenting with the plugin’s capabilities and so that I can gain deeper knowledge on how the other nodes in dynamo really work inside-out.
OK. In that case you will need to give me something to work with. Since I am not at your computer a detailed description of your process supported a few screenshots would help me better understand your issue. If that’s not enough for me to re-create the problem/solve it then I will ask you to post your files. I just enabled attachments for comments so you will be able to upload your files.
Thanks!
Hi Konrad, the file attachment isn’t enabled yet on my end.
Thanks!
Hi,
Thank you for sharing. These are great!
However, may you please explain how I may pick up family type ID for the create Family by type node you had posted? I am having trouble figuring out the correct set-up.
It will be much appreciated!
Thank you
Best,
Sean
Sean,
Thanks for kind words. If you want to get a Family Type Id just drop in a Family Types node and then most likely a custom node that I have posted on Download Page that is called Element Id. The reason I am suggesting my own custom node is that it will output either Element Id (a Revit API object) or integer value if you need to compare it to something else. The built in Element.Id node that exists in Dynamo will give you integer values and it won’t work with some/most of my examples. Here’s an https://archi-lab.net/wp-content/uploads/2014/10/Capture.png Good luck!
Hi Konrad,
i’ve been trying to get the Select Model Lines by Style to work, but it doesn’t seem to react to any of my lines.
I’ve placed some additional model lines of the style “Lines” in my project and tried to get the node to trigger on it, but so far no luck. Does this node work with Dynamo .7 and revit 2015?
kind regards
Dave,
I haven’t tested them on Revit 2015, but I did build it on top of Dynamo 0.7.2. Feel free to send me your files to ksobon@iit.edu and i will have a look at your files when I have a min. Also, it usually helps me better answer your questions when you post what exactly was the error message or at least post some images so that I can get an idea about what’s going on. Thanks for following and good luck!
Dave,
Actually it was a 0.6.3 build that you were looking at. I since updated to the latest version. I am sorry about that. It should work fine now with the 0.7.2.
Hello Konrad,
I’ve been using your deprecated node for Rotate Family on 0.63, but when using it on 0.7x it does not work. Is there any other option to roate family instances on 0.7x?
Thanks in advance
Diego,
Rotate Family has been updated to 0.7.4. You can find it here: https://archi-lab.net/?page_id=47
Good luck!
Your work is very inspiring, what you are doing is putting Dynamo to practical use which something very good
and better still you are generous to share which I awsome
Thank you!
There is problem with “get all Views” it give null
output in Revit 2015 Dynamo Ver 0.7.4.2014
Please help
None of the content here was tested with Revit 2015, yet. I am sorry about that and hopefully i can get to it sometime in the future. For now its all Revit 2014 compatible.
Is there any way in dynamo to get room size, the longest and shortest dimension and put in room tag
hi konrad, i just saw that you solved the problem with collections in python.
unfortunately i don’t see the solution in your code sniplet.
her is my code:
i have a list of assemblies and want to add one element.
revitapi wants an ICollection, but how do i construct one?
thanks for your support
peter
dataEnteringNode = IN
assemblies=UnwrapElement(IN[0])
cogs=UnwrapElement(IN[1])
for i in range(0,len(assemblies)):
coglist=[]
coglist.append(cogs[i].Id)
assemblies[i].AddMemberIds(coglist)
OUT = assemblies
So, if coglist has to be an ICollection to be added to assemblies then you would do something like this:
from System.Collections.Generic import *
for i in range(0,len(assemblies)):
coglist = List[type of element that will be added ex. Point, int, etc]()
coglist.Add(cogs[i].Id)
assemblies[i].AddMemberIds(coglist)
OUT = assemblies
When Revit API says it requires a ICollection or IList its really the same thing. The only difference between an IList and regular Python list is that its “typed”. What that means is that you have to specify a type of elements that it will hold. Ex. newList = List[int]() and that will create a typed list that you can add integers to. It will not accept any other type of data though. Also, to add elements you use Add() method rather than append(). To convert a python list to typed list you can do this: pythonList = [0,1,0,5], typedList = List[int](pythonList)
Good luck!
How can I take “type Mark” and transfer it to a shared parameter (instance parameter of type url)?
My shared parameter is a url to a webpage and the type mark refers to a specific place on the webpage. I would therefore like to append the type marks to the end of my shared parameter. How can I achieve this? Pease help. I have tried almost everything in dynamo.
Nicklas,
I appreciate that you would turn to me with such a question, but generally its easier to get an answer if you ask this question on a Dynamo blog. Anyways, since this was relatively easy to do i worked out a solution for you. Good luck!
Attachment: Capture.png
YOU ARE THE BEST! thank you so much.
Hi Konrad
Is there any way in dynamo to get room size, the longest and shortest dimension and put in room tag
Of course there would be a way, problem with that is purely practical. This approach proves only reliable (as if you wanted to list a room size this way) with rooms that have a rectangular shape. What about rooms in shape of other n-gons? I hate to discriminate against them so I will unfortunately have to bow out from this exercise. Do fill me in on your progress though. I am very much interested in your findings. Good luck!
Hi Konrad,
I was badly hoping for some sort a solution, but that is not very disappointing though. I fact it is very encouraging to know that some will be watching over the progress in matter. Could be kind to point me the right direction for this exercise, which parameters in the API should I be looking at and/or any ready nodes I should be looking at.
your guidance would be highly valued.
Taha,
You can look at Package called Lunchbox. It has room information extractor that includes room boundary lines. You can take those lines then and query each one for a Length (Line.Length). That should give you what you want.
Good luck!
Archi-Lab’s tools are incredible! I use them on a regular basis. I’m having a problem with the Key Schedule node. This node is an answer to my prayers. Thanks so much. It works for 18 lines of my data and then something trips it up.
Is there a limit on string length that the node can import or characters that may create a hiccup?
Thanks in advance (using Revit 2014)
Timon,
I don’t know what can cause this behavior. I was successfully importing hundred of data sets and never encountered the problem. Can you post your files to DropBox (Revit, Dynamo, Grasshopper, Rhino anything that is relevant) and I can have a look at it.
Thanks!
Can you email me a private way to send you the attachments? Thank you
ksobon1986 [at] gmail [dot] com
Hi Konrad,
That was a very good advice will work on it during the weekend.
I tried to use the “Select Model Lines by style” but it was not successful. it could not find the line. for ease of reference, I created a line style named “1”, but it still did not work. dynamo 0.8 / dynamo 0.75 revit 2015. Please Explain how to use it.
Alexey,
Everything seems to be working just fine. Please see the example:
Attachment: Capture5.jpg
Maybe you can send me this files. And i will try to understand what i done wrong. My mail brichevaa@gmail.com
I am sorry but I am afraid I cannot do that (I am at work and sharing work related files is not a good idea). The only thing that I can think of is that you are not trying to select Model Lines but rather Drafting Lines. This node WILL NOT select Drafting Lines.
Sorry for disturb. your plugin works fine, but only on the English version of the program. (I had a Russian version) Thank you for your work. could you tell me how to change the python code for the Russian version.
Attachment: send.jpg
Alexey,
Iam sorry to say this but, I don’t provide any support of that sort. All of the software/code provided here are open source/free so you have the utmost freedom to go ahead and modify it as needed to make it work on other than English version platforms. However, I don’t have any intention of doing that myself.
Good luck!
Dear Konrad,
I am had problems using the elements in room example that you have shown.
Somehow there is problem with get ” get room by elements”. It shows a null even though I had 14 rooms on the level.
I have attached the dyf files & the revit file.
Wouldn’t appreciate if you can advise what went wrong.
Thanks.
Delphy.
Attachment: Elements-in-Room.zip
Hi Konrad
Your nodes had helped me a lot..
Maybe you can help again. I want to change a line style of a given line, in the shown case, Detail Lines.
Attachment: WallLines-DetailLines_LineStyleChangeError.png
Kristian,
You are almost there. As you have noticed by reading the warning (I am guessing that you did read the warning) the storage type that you supplied to Element.SetParameterByName node was not correct. What that means is, that in order to change Line Style of a line you have to feed it a Line Style object and not its name (“Medium Lines” is a name of a given style and not the style itself). Luckily for you archi-lab package has exactly what you need, and that is a node called Get Line Style by Name which will retrieve a line style for you based on its name. Please see my example in the image below for the correct approach to this problem. Good luck!
Attachment: Capture6.jpg
That was a quick answer – Thanks!!!
I tried that, and for some reason it didnt work for the first couple of times… – but for some other reason it does now.!!!
You are AWESOME… Thanks a lot…
Thanks a lot for this solution: http://joxi.ru/p27OvO3C79Ok27?d=1
I digged all Google only for C# icollectors.
But your solution is so simple to understand.
I found your YouTube video on “Create Sheets in Revit from Excel Spreadsheet using Dynamo” and had a huge moment of inspiration! I had no idea about Dynamo as our firm has just fully moved to REvit from AutoCAD MEP.
I would really like to put Dynamo to work creating sheets from excel and am wondering if the “Script?” you were showing in the video is available?
Thanks for the inspiration and first glance at Dynamo!
Chris Hildebran
Well, i found your article here “https://archi-lab.net/sheets-from-excel-with-dynamo/” so with that and your video im giving it a go! Very cool!
Chris,
Yes, if you follow the step by step instructions you should be able to re-create it. I can share the file, but I am much happier when people put the effort into recreating it, because I believe that you learn so much more from it. Give it a go and let me know if you have any issues.
Good luck!
I agree Konrad!
Give a man a fish, feed him for a day.
Teach a man to fish, feed him for a lifetime.
Thanks!
Hi Konrad,
I was trying to change font type in Revit using Dynamo but able to do it for Text Note Types and for Annotations I have to run node for each family. Is there an easy way to change font type for all the Annotations at once.
Regards,
Hi Konrad,
i tried to use RotateFamily node but it gives error every time i try.
Can you please check the image which is enclosed. where is my mistake?
Regards
Attachment: SoruKonradSabon_RotateFamily.jpg
Axis should be a line and not a Vector.
Hello Konrad,
Great stuff, first off! All these additions are incredibly useful. I have one question for you though. In the image I have recreated your Key Schedule Dynamo script, but I am trying to use it to create columns in an assembly schedule. The assembly schedule acts like a key schedule, and can be edited by your other key schedule editing tools (Schedule Formatting & Schedule Grouping/Sorting) which I have successfully set up, but the final piece of the puzzle that would accomplish a complete workflow for assembly schedule management would be to add columns and then use those other tools to format them. I was wondering if there was any way to eliminate the data row (which drives the row count and information) and only have the Parameters and Schedule inputs? The goal is to automate the “Edit Fields” portion of schedules so I can have a typed Code Block with the parameters I would like to add as fields to my Schedule.
Thanks,
-Tyler Graff
Attachment: ScheduleSetParameters.jpg
Tyler,
Revit currently doesn’t support adding parameters (columns) via API calls. It can only be done using the UI. That’s why I demonstrated the whole process with schedule already pre-created. Sorry.
Rats.
Thank you for the quick reply Konrad. It seems we have run into a couple things like that recently, so it appears it is high time for me to learn some code. I appreciate all the work on the macros and keeping people informed on how to use them!
-Tyler
Hi,
how I am new to Dynamo how I can use the Apply View Template node and filter the views by scale to apply a template..
thanks for the help
William,
Please have a look at this link: https://archi-lab.net/downloads/revitdynamo/
Scroll down to the section that discusses applying view templates.
Good luck!
Hello, i’m totally new to dynamo. Right now i am trying to start using it by creating a way to change the type of a material tag. Iam using your change family type node but i’m failing to make it work even with a single tag. As you can see all i get form change family type is “null”. In the Family types node i have a diferent type of the family selected in the select node. I´ve read a comment here about the problem with the original element id node, is this a case where it won´t work? I could not find your element id node because the link you gave in your answer is pointing to this same page. Could you point me in the right direction? Thank you and congrats on your work!
Attachment: change-family-type-001.png
Hi Konrad Sobon,
You works are amazing and I do really appreciate for sharing these great works.
Crazy.. How one person can make world different!
Again, thanks very much.
Thank you, your kind words are appreciated.
Hi Konrad Sobon,
How are you going?
Amazing works..and always appreciate for it.
Thanks for the sharing your work.
Hi Konrad Sobon,
I have problems to use DoorSetHanding node and PolyCurveByProfileFamilyType node.
I have attached a zip file for you to take a look at.. It will be great if you could help me out.
Thank you very much.
Attachment: Inquiries_20151212.zip
I’ve got “Key Schedule” working well. A caveat is that it only seems to work with strings. Any chance of opening it up to working with lengths and numbers?
It probably could. I don’t currently expect to be adding that functionality anytime soon. Sorry.
Arg. What am I missing. Where are the actual files for download?
I don’t host any of the files here. Please download all of the nodes from Package Manager in Dynamo.
I must be doing too many drugs in the morning but I cannot find where to download the nodes. I have looked for a signup, add to cart. Nothing.
I know I am missing where to get it so can someone push me off the cliff in the direction to where to get these nodes?
they are not hosted here. you can get all of them using Dynamo Package Manager and searching for archi-lab package.
Good morning Konrad,
I followed the Create Annotation Tag for furniture (as shown clearly above – thank you) and go it to work, but the tag is invisible in my project.
I can locate it in my project with Select by ID (since the Dynamo script gave me the element ID of the Independent Tag that was placed).
It’s in there… but not visible.
I don’t understand… since I thought the script would actually place the tag onto the furniture like I could do manually.
Please advise.
Good morning Konrad,
First of all, congrats and thank you for all the info showed in such an amazing blog!!
I have some issues trying to “Add Shared Parameter to Project”; I have carefully followed your instructions but I cannot succeed.
When I run the workflow, a yellow warning appears in my screen as showed below.
My version of Dynamo is 0.9.1.4062 and I am using it through REVIT 2017, could it be because of my software versions?
Do you see anything weird? Did I misunderstand anything?
PD: last doubt, would I be able to eliminate parameters using dynamo? Or just modificate their values?
Thanks in advance for your advice.
Alex
Attachment: 1.jpg
HI Sir,
What version from DynamoPackages.com can I install to work with Revit 2014?
Donovan
2014? I am sorry but I doubt if any of the archi-lab packages will work with that version. It’s pretty old.
I want to download the DOOR SET HANDING, where can I do it?
I hope you can reply soon. I am new at using Dynamo so I am trying to understand…
Thankyou!
You would just install Dynamo, and then go to Package Manager. From there you can install archi-lab.net package. Door Set Handing node will be in there.
Hello,
Thanks for your posts.
I’m new to dynamo and I have found a lot of examples on your page that I really need to use, such as the key schedules. How do I download the package? is it free o I’ve to pay? please help
Thanks
Install Dynamo, open the Package Manager and download archi-lab.net package. That’s the standard way of getting packages installed. They are all free.
I would like to combine two revit schedule into one and insert a new one with a new name inside the schedule…
Tips??
That makes no sense. I think you have asked the same question on a Dynamo Forum. If I remember correctly the answer there was that Schedules in Revit are just tabular representation of elements in the model. You would simply want to create another schedule that encompasses elements from both via adding more categories or creating a multi category schedule, and then setting up some filters etc. This can and should be all done with Revit itself, not Dynamo.
Hello Konrad, Some great scripts over here, wondering if your ‘Elements in Room’ script can help me with a workflow i am looking for.
Currently we have a shared parameter associated with the room and our designers count and manually input the desk count in that field. The room tag then picks that information and displays it in the tag. (Please see attached) I am looking for a dynamo workflow that grabs the furniture count from a room and displays it in a room tag. To start with i am interested in counting only one family (desk) and displaying that info in the room tag. Essentially automating that “24 DESKS” count, which is currently a manually input value.
Would appreciate your input,
Thanks
Attachment: deskcount.jpg
Yes, this is possible to sort out with Dynamo. I don’t have a script that does that already, but it’s possible. Good luck!
hi,
I want to use “create annotation tag” in revit 2016 but it is version error so what is your suggestion, whar i can do? i guess, i do not use this packages in revit 2016
2016 is really old. Dynamo 2.0 doesn’t support that version anymore.
That’s an old Revit version. Dynamo 2.0 is no longer supporting it. Please update to something more recent – 2019.
Hi Konrad
First of all thank you for sharing your work, I’m just new with Dynamo and your nodes are incredible !
I’m trying to use Cell Style Settings node with Dynamo 2.0 and Revit 2019, and it seems that it does not work, there is no change in the schedule that I want to modify, I send you an image of the script to see if you can help me
thank you
Attachment: Captura-2.png
Have a look at this page: https://archi-lab.net/downloads/revitdynamo/ There is an example on how to properly style the header cell in a schedule. I see that you are putting a bool value to border inputs. Border inputs are for line styles. So either submit null if you don’t want to override them, or submit a line style. That’s probably what’s causing the issue.
Dear Konrad,
Great work!
With a view a creating a door schedule (with associated room data), I created a simple room data model (containing 3 rooms) and linked it to an architectural shell model (partitions and doors) in Revit 2017: however, all i get is a list of ‘Empty List’ (see screenshot in attached file). I did follow your example as per above. Do you know where I am going wrong?
Thanks in advance
Attachment: Annotation-2019-09-09-141141.jpg
I am not sure that Revit ever considers Doors to be “in” a Room. Just see how Room boundaries are defined. That line is usually at the face of the Wall, while most Doors are usually embedded into the wall. The way to associate Doors to Rooms is via ToRoom and FromRoom property on the Door. You have to ensure Room calculation point is tuned on for all Door families.
When I use the “Key Schedule” node, my columns are shifted from 1 column to the right in the key schedule in Revit. In the first column (Key Name values), it creates numbers (1, 2, 3 etc). See attached JPG file.
Is it the way the node works? Do I have to fill in every key name manually in Revit?
Thank you in advance.
Attachment: Dynamo1.jpg
I think the first column will always have to be numbers like that. They have to be unique “keys” so my node will generate just sequence of numbers.
HI Konrad,
I am using Dropdown List Selector for one of the my Dynamo script. Whenever i use the script to new project, dropdown list is not refreshing and showing previous project data in the list. Your help on resolving this would be really helpful.
Thank You!
Nitesh Panchal
Attachment: Isolate-Elements-by-Workset.png
I will have a look at it. Thanks for posting.
Hello,
I try to use one of your nodes ( Marker Settings from Analysis set) to show light hours analysis. All nodes except this one seem to work properly, but this one gives me nulls, i fed it with” “Triangle”; double, elementId, double, “ShowNone”, but it gives me null output. When I open custom node i gives a warning about ElementId input “Warning: Cannot find type ‘Autodesk.Revit.DB.ElementId’.
I cannot find a solution to resolve this problem and would appreciate your help.
I use Dynamo Revit build 2.3.0.7661 and archi-lab.net 2020.23.13
Thank you,
Łukasz Maleszewski
I would probably need sample files to even begin thinking about what could potentially be wrong.
Hi Konrad,
I am using your key schedule node from your amazing package.
However the node seems only feed text parameter types.
Any idea?
I have left you a message also in the dynamo bim forum.
Many thanks
Yeah, that node only allows for processing of Text/string values.
Hi, Konrad! Your Door Set Handling node and its implementation is amazing! If I understood right, it is possible to download your custom node? I can’t find anywhere the download button, which is possible to see in Håvard Vasshaug’s video… Do I need to register somehow to be able to download the node?
A lot of thanks in advance!:)
Margarita, no need to register. You can get that node by using the Package Manager and downloading archi-lab.net package directly from Dynamo. Cheers!
Hi Mr.Konard, I am using archi-lab.net package in my dynamo scripts which is very helpful. Here my query is I can select entities from drop down in dynamo using the node ‘drop down list selector’ but I want to run in dynamo player instead of opening dynamo everytime. Is there a way for this?
I don’t think you can expose any node from Dynamo in the Dynamo Player menu. You can try by right-clicking on the node, and setting it as Input Node, but if that’s not available then Dynamo Player won’t recognize it. There is a limit to what you can make available in Dynamo Player. Might have to come up with a different way to organize your scripts if you need them Dynamo Player compatible.
Get all view code block is not available in your package which i downloaded in revir 2020 package.
Please help
Attachment: Screenshot-2021-05-07-163004.png
Madhana, that node no longer exists in my package. You can get all schedules using View Type > Views.GetByType nodes.
Sorry the dumb question, but how do I download the package?
Package Manager in Dynamo.